Throughout this Laravel 9 yajra datatables Example Tutorial; you will learn how to create and show the yajra datatables laravel 9 example for server side ajax.
This tutorial gives you step by step guide to implement the yajra datatables laravel examples.. You can use the yajra datatabales with dyamic database records to show with pagination and search box with bootstrap.
You can use the this server side Yajra datatable example with search, pagination in your larfavel 5, laravel 6, laravel 7, laravel 8 or laravel 9 sequencelly.
Laravel 9 Datatables Example
DataTables is a plug-in powered by jQuery often known as Javascript library. It is a notably flexible tool, developed upon the foundations of progressive and dynamic enhancement, that incorporates all of these subtle and advanced features to any static HTML table.
Yajra datatables top-notch features:
- Pagination
- Instant search
- Multi-column ordering
- Use almost any data source
- Easily theme-able
- Wide variety of extensions
- Mobile friendly
- Fully internationalisable
Follow the below steps to implement Yajra datatables in laravel application:
- Step 1: Install Laravel App
- Step 2: Install Yajra Datatables
- Step 3: Create Model and Migrations
- Step 4: Create Controller
- Step 5: Add Route
- Step 6: Display Data in Datatables Blade File
- Step 7: Generate Fake Records for Test
- Step 8: Start Laravel App
Install Laravel App
First we need to install new laravel application using the below-mentioned artisan command.
composer create-project laravel/laravel laravel-yajra-datatablesGet into the project:
cd laravel-yajra-datatables Install Yajra Datatable Package
Install the Yajra DataTable plugin in Laravel using the following command:
composer require yajra/laravel-datatables-oracleAdditionally, enlarge the foundational service of the package such as datatable service provider in providers and alias inside the config/app.php file.
'providers' => [
	....
	....
	Yajra\DataTables\DataTablesServiceProvider::class,
]
'aliases' => [
	....
	....
	'DataTables' => Yajra\DataTables\Facades\DataTables::class,
]
Run vendor publish command further this step is optional:
php artisan vendor:publish --provider="Yajra\DataTables\DataTablesServiceProvider"
Create Model and Migrations
Run command to create a model, and it holds the schema of the database table.
php artisan make:model Student -mNow open the database migration file and put the below code on it.
database\migrations\2022_03_07_025452_create_students_table.php
<?php

use Illuminate\Database\Migrations\Migration;
use Illuminate\Database\Schema\Blueprint;
use Illuminate\Support\Facades\Schema;

class CreateStudentsTable extends Migration
{
    /**
     * Run the migrations.
     *
     * @return void
     */
    public function up()
    {
        Schema::create('students', function (Blueprint $table) {
            $table->id();
            $table->string('name');
            $table->string('email')->unique();
            $table->string('username');
            $table->string('phone');
            $table->string('dob');
            $table->timestamps();
        });
    }

    /**
     * Reverse the migrations.
     *
     * @return void
     */
    public function down()
    {
        Schema::dropIfExists('students');
    }
}
Open app/Models/Student.php and add the fillable properties.
<?php

namespace App\Models;

use Illuminate\Database\Eloquent\Factories\HasFactory;
use Illuminate\Database\Eloquent\Model;

class Student extends Model
{
    use HasFactory;

    protected $fillable = [
        'name',
        'email',
        'username',
        'phone',
        'dob',
    ];
}
Run migration using the following command.
php artisan migrateCreate Controller and Update Code
Create a controller using the below command.
php artisan make:controller StudentControllerOpen app/Http/Controllers/StudentController.php file and add the following code.
<?php

namespace App\Http\Controllers;

use Illuminate\Http\Request;
use App\Models\Student;
use DataTables;

class StudentController extends Controller
{
    public function index(Request $request)
    {
        if ($request->ajax()) {
            $data = Student::latest()->get();
            return Datatables::of($data)
                ->addIndexColumn()
                ->addColumn('action', function($row){
                    $actionBtn = '<a href="javascript:void(0)" class="edit btn btn-success btn-sm">Edit</a> <a href="javascript:void(0)" class="delete btn btn-danger btn-sm">Delete</a>';
                    return $actionBtn;
                })
                ->rawColumns(['action'])
                ->make(true);
        }

        return view('students');
    }

}
Add Route
Open routes/web.php and add the given code.
<?php

use Illuminate\Support\Facades\Route;
use App\Http\Controllers\StudentController;

Route::get('students', [StudentController::class, 'index'])->name('students');
Display Data with Yajra Datatables
Now we will create an students.blade.php file spontaneously. Designing a beautiful table is a bit tricky if you don’t know how to work with HTML and CSS. This is what bootstrap set out to do.
Open resources/views/students.blade.php file and place the following code.
<!DOCTYPE html>
<html>
<head>
    <title>Laravel 8|9 Datatables Tutorial</title>
    <meta name="csrf-token" content="{{ csrf_token() }}">
    <link rel="stylesheet" href="https://stackpath.bootstrapcdn.com/bootstrap/4.5.0/css/bootstrap.min.css"/>
    <link href="https://cdn.datatables.net/1.10.21/css/jquery.dataTables.min.css" rel="stylesheet">
    <link href="https://cdn.datatables.net/1.10.21/css/dataTables.bootstrap4.min.css" rel="stylesheet">
</head>
<body>

<div class="container mt-5">
    <h2 class="mb-4">Laravel 8|9 Yajra Datatables Example</h2>
    <table class="table table-bordered yajra-datatable">
        <thead>
            <tr>
                <th>No</th>
                <th>Name</th>
                <th>Email</th>
                <th>Username</th>
                <th>Phone</th>
                <th>DOB</th>
                <th>Action</th>
            </tr>
        </thead>
        <tbody>
        </tbody>
    </table>
</div>

</body>
<script src="https://ajax.googleapis.com/ajax/libs/jquery/1.9.1/jquery.js"></script>
<script src="https://cdnjs.cloudflare.com/ajax/libs/jquery-validate/1.19.0/jquery.validate.js"></script>
<script src="https://cdn.datatables.net/1.10.21/js/jquery.dataTables.min.js"></script>
<script src="https://stackpath.bootstrapcdn.com/bootstrap/4.5.0/js/bootstrap.min.js"></script>
<script src="https://cdn.datatables.net/1.10.21/js/dataTables.bootstrap4.min.js"></script>
<script type="text/javascript">
  $(function () {

    var table = $('.yajra-datatable').DataTable({
        processing: true,
        serverSide: true,
        ajax: "{{ route('students') }}",
        columns: [
            {data: 'DT_RowIndex', name: 'DT_RowIndex'},
            {data: 'name', name: 'name'},
            {data: 'email', name: 'email'},
            {data: 'username', name: 'username'},
            {data: 'phone', name: 'phone'},
            {data: 'dob', name: 'dob'},
            {
                data: 'action',
                name: 'action',
                orderable: true,
                searchable: true
            },
        ]
    });

  });
</script>
</html>
Create Dummy Records for Testing
To give you the demo of Yajra DataTables in Laravel, we need to generate a handful of dummy data. Use the built-in plugin Faker, and it respectively creates the fake data in the database.
Create Student Seeder using the following command:
php artisan make:seeder StudentSeederOpen database\seeders\StudentSeeder.php and put the below code on it.
<?php

namespace Database\Seeders;

use Illuminate\Database\Seeder;
use Faker\Factory as Faker;
use App\Models\Student;

class StudentSeeder extends Seeder
{
    /**
     * Run the database seeds.
     *
     * @return void
     */
    public function run()
    {
        $faker = Faker::create();
        $gender = $faker->randomElement(['male', 'female']);
    	foreach (range(1,200) as $index) {
            Student::updateOrCreate([
                'email' => $faker->email,
            ],[
                'name' => $faker->name($gender),
                'username' => $faker->username,
                'phone' => $faker->phoneNumber,
                'dob' => $faker->date($format = 'Y-m-d', $max = 'now')
            ]);
        }
    }
}
Now run the below command for generating test records for students table:
php artisan db:seed --class=StudentSeederStart Laravel App
Now run the following command and check our progress on the browser.
php artisan serveHere is the output you get after executing the mentioned command:
http://127.0.0.1:8000/students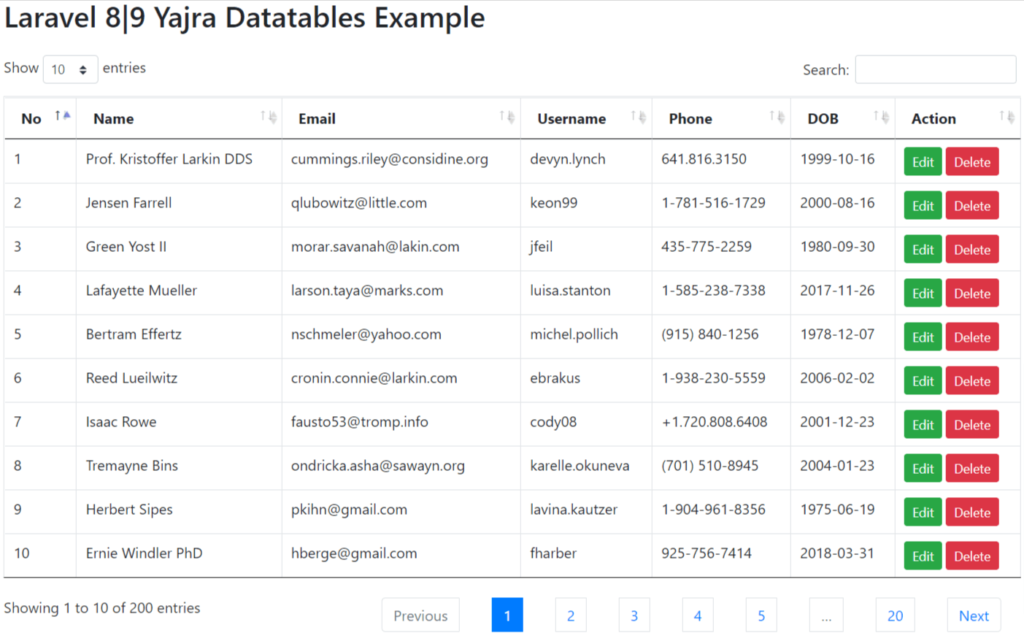
I hope you enjoy with how to make Yajra datatables in Laravel 8|9 tutorial exampl. Feel free to ask us using comment section and follow us for more updates.