Throughout this Laravel 9 passport authentication tutorial example, you will see how to create a secure REST API using Passport in Laravel 9. In this tutorial, we will learn to create robust, fast, and secure CRUD (CREATE, READ, UPDATE, DELETE) RESTful Authentication API with Passport Package in Laravel 9 by following all the imperatives needed to be followed.
Laravel makes building such a resource easy with a predefined provision for you to secure it appropriately. This tutorial will teach you how to build and secure your Laravel back-end API using Laravel passport. Laravel 9 Passport takes care of security and allows you to create Auth Token to provide authentication to users.
To secure this application, we will install Laravel Passport and generate an access token for each user after authentication. This will allow such users to have access to some of the secured endpoints.
Laravel REST API with Passport Authentication Tutorial
Use the following steps and create api rest with laravel 9 passport authentication:
- Step 1: Download Laravel App
- Step 2: Create Database & Connect
- Step 3: Install & Configure Laravel Passport
- Step 4: Create Passport Controller
- Step 5: Update APIs Routes
- Step 6: Now Test Laravel REST API in Postman
Install Laravel App
Open terminal further run below command to manifest a new laravel project, ignore this step if project is already installed:
composer create-project laravel/laravel laravel-passport-auth Go inside the app;
cd laravel-passport-authCreate Database & Connect
This step explains how to make database connection by adding database name, username and password in .env config file of your project:
DB_CONNECTION=mysql
DB_HOST=localhost
DB_PORT=3306
DB_DATABASE=#your database name
DB_USERNAME=#database username
DB_PASSWORD=#database password
Install And Configure Laravel Passport
On an impulse, the second step leads us to install the passport package through Composer package manager. Without further ado run the following command in your terminal.
composer require laravel/passportOnce the installation is complete, a new migration file containing the tables needed to store clients and access tokens will have been generated for your application. Run the following command to migrate your database:
php artisan migrateNext, to create the encryption keys needed to generate secured access tokens, run the command below:
php artisan passport:installImmediately after the installation process from the preceding command is finished, add the Laravel\Passport\HasApiTokens trait to your App model as shown here:\Models\User
<?php

namespace App\Models;

use Illuminate\Contracts\Auth\MustVerifyEmail;
use Illuminate\Database\Eloquent\Factories\HasFactory;
use Illuminate\Foundation\Auth\User as Authenticatable;
use Illuminate\Notifications\Notifiable;
// use Laravel\Sanctum\HasApiTokens; // comment this
use Laravel\Passport\HasApiTokens; // include this

class User extends Authenticatable
{
    use HasApiTokens, HasFactory, Notifiable;

    /**
     * The attributes that are mass assignable.
     *
     * @var array<int, string>
     */
    protected $fillable = [
        'name',
        'email',
        'password',
    ];

    /**
     * The attributes that should be hidden for serialization.
     *
     * @var array<int, string>
     */
    protected $hidden = [
        'password',
        'remember_token',
    ];

    /**
     * The attributes that should be cast.
     *
     * @var array<string, string>
     */
    protected $casts = [
        'email_verified_at' => 'datetime',
    ];
}
Next, open app/Providers/AuthServiceProvider.php file and register the registerPolicies() method inside the boot() function, It will evoke the required routes.
app/Providers/AuthServiceProvider.php<?php
namespace App\Providers;
use Illuminate\Foundation\Support\Providers\AuthServiceProvider as ServiceProvider;
use Illuminate\Support\Facades\Gate;
use Laravel\Passport\Passport; // add this
class AuthServiceProvider extends ServiceProvider
{
/**
* The policy mappings for the application.
*
* @var array<class-string, class-string>
*/
protected $policies = [
'App\Models\Model' => 'App\Policies\ModelPolicy',
];
/**
* Register any authentication / authorization services.
*
* @return void
*/
public function boot()
{
$this->registerPolicies();
Passport::routes(); // Add this
}
}After registering Passport::routes(), Laravel Passport is almost ready to handle all authentication and authorization processes within your application.
Finally, for your application to be ready to use Passport’s TokenGuard
to authenticate any incoming API requests, open the config/auth configuration file and set the driver option of the api authentication guard to passport:
config\auth.php
<?php

return [

    /*
    |--------------------------------------------------------------------------
    | Authentication Defaults
    |--------------------------------------------------------------------------
    |
    | This option controls the default authentication "guard" and password
    | reset options for your application. You may change these defaults
    | as required, but they're a perfect start for most applications.
    |
    */

    'defaults' => [
        'guard' => 'web',
        'passwords' => 'users',
    ],

    /*
    |--------------------------------------------------------------------------
    | Authentication Guards
    |--------------------------------------------------------------------------
    |
    | Next, you may define every authentication guard for your application.
    | Of course, a great default configuration has been defined for you
    | here which uses session storage and the Eloquent user provider.
    |
    | All authentication drivers have a user provider. This defines how the
    | users are actually retrieved out of your database or other storage
    | mechanisms used by this application to persist your user's data.
    |
    | Supported: "session"
    |
    */

    'guards' => [
        'web' => [
            'driver' => 'session',
            'provider' => 'users',
        ],
        'api' => [
            'driver' => 'passport', // set this to passport
            'provider' => 'users',
            'hash' => false,
        ],
    ],

    /*
    |--------------------------------------------------------------------------
    | User Providers
    |--------------------------------------------------------------------------
    |
    | All authentication drivers have a user provider. This defines how the
    | users are actually retrieved out of your database or other storage
    | mechanisms used by this application to persist your user's data.
    |
    | If you have multiple user tables or models you may configure multiple
    | sources which represent each model / table. These sources may then
    | be assigned to any extra authentication guards you have defined.
    |
    | Supported: "database", "eloquent"
    |
    */

    'providers' => [
        'users' => [
            'driver' => 'eloquent',
            'model' => App\Models\User::class,
        ],

        // 'users' => [
        //     'driver' => 'database',
        //     'table' => 'users',
        // ],
    ],

    /*
    |--------------------------------------------------------------------------
    | Resetting Passwords
    |--------------------------------------------------------------------------
    |
    | You may specify multiple password reset configurations if you have more
    | than one user table or model in the application and you want to have
    | separate password reset settings based on the specific user types.
    |
    | The expire time is the number of minutes that each reset token will be
    | considered valid. This security feature keeps tokens short-lived so
    | they have less time to be guessed. You may change this as needed.
    |
    */

    'passwords' => [
        'users' => [
            'provider' => 'users',
            'table' => 'password_resets',
            'expire' => 60,
            'throttle' => 60,
        ],
    ],

    /*
    |--------------------------------------------------------------------------
    | Password Confirmation Timeout
    |--------------------------------------------------------------------------
    |
    | Here you may define the amount of seconds before a password confirmation
    | times out and the user is prompted to re-enter their password via the
    | confirmation screen. By default, the timeout lasts for three hours.
    |
    */

    'password_timeout' => 10800,

];
Create Authentication Controller
Let us take another imperative in the consideration and, on the same impetus, execute the following command. It will create a new controller in our laravel app to create a login and registration REST API.
php artisan make:controller Api/AuthControllerController is the quintessential file in Laravel application development. So, without further insert the given below code in AuthController.php file.
app\Http\Controllers\Api\AuthController.php
<?php

namespace App\Http\Controllers\Api;

use App\Http\Controllers\Controller;
use Illuminate\Http\Request;
use Illuminate\Support\Facades\Validator;
use Illuminate\Support\Facades\Hash;
use Illuminate\Support\Facades\Auth;
use App\Models\User;

class AuthController extends Controller
{
    public function register(Request $request)
    {
        $requestData = $request->all();
        $validator = Validator::make($requestData,[
            'name' => 'required|max:55',
            'email' => 'email|required|unique:users',
            'password' => 'required|confirmed'
        ]);

        if ($validator->fails()) {
            return response()->json([
                'errors' => $validator->errors()
            ], 422);
        }

        $requestData['password'] = Hash::make($requestData['password']);

        $user = User::create($requestData);
        $accessToken = $user->createToken('authToken')->accessToken;

        return response([ 'user' => $user, 'access_token' => $accessToken]);
    }

    public function login(Request $request)
    {
        $requestData = $request->all();
        $validator = Validator::make($requestData,[
            'email' => 'email|required',
            'password' => 'required'
        ]);

        if ($validator->fails()) {
            return response()->json([
                'errors' => $validator->errors()
            ], 422);
        }

        if(! auth()->attempt($requestData)){
            return response()->json(['error' => 'UnAuthorised Access'], 401);
        }

        $accessToken = auth()->user()->createToken('authToken')->accessToken;

        return response(['user' => auth()->user(), 'access_token' => $accessToken]);
    }

    public function me(Request $request)
    {
        $user = $request->user();

        return response()->json(['user' => $user], 200);
    }

    public function logout (Request $request)
    {
        $token = $request->user()->token();
        $token->revoke();
        $response = ['message' => 'You have been successfully logged out!'];
        return response($response, 200);
    }
}
Update Routes File
Now, we will define API routes. Go to routes/api.php file and declare the foundational code.
<?php

use Illuminate\Http\Request;
use Illuminate\Support\Facades\Route;
use App\Http\Controllers\Api\AuthController;

/*
|--------------------------------------------------------------------------
| API Routes
|--------------------------------------------------------------------------
|
| Here is where you can register API routes for your application. These
| routes are loaded by the RouteServiceProvider within a group which
| is assigned the "api" middleware group. Enjoy building your API!
|
*/

Route::post('register',[AuthController::class,'register']);
Route::post('login',[AuthController::class,'login']);

Route::middleware('auth:api')->group( function () {
    Route::post('/logout', [AuthController::class, 'logout']);
});


// Route::middleware('auth:sanctum')->get('/user', function (Request $request) {
//     return $request->user();
// });
Test Laravel Passport Api
Eventually, we have completed all the foundational steps that were required to build REST API with Passport authentication in Laravel. Now, the time has come to test out the API, so run the following command to start the laravel app.
We have to rely on Postman for testing our newly formed endpoints.
Please open the Postman app and Headers tab, define "Accept": application/json header value:
php artisan serveRegister user
To register a user, send a POST HTTP request to this endpoint http://localhost:8000/api/register and input the appropriate details as shown here:
Now, your details might not be similar to this, but here is what the key and value of your requests should look like:
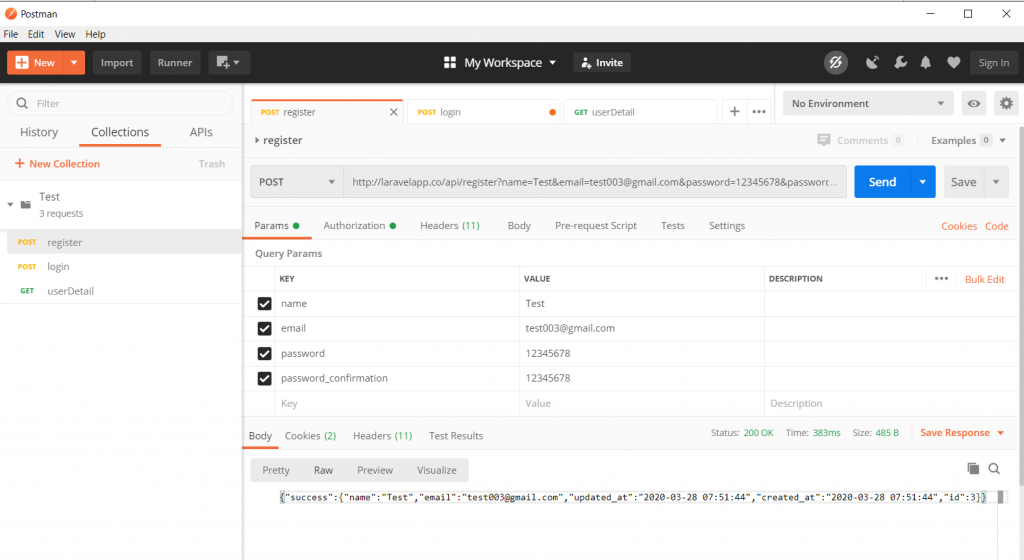
Example Value:
KEY                     VALUE
name                    Test User
email                   test@example.com
password                password
password_confirmation   password
Login user
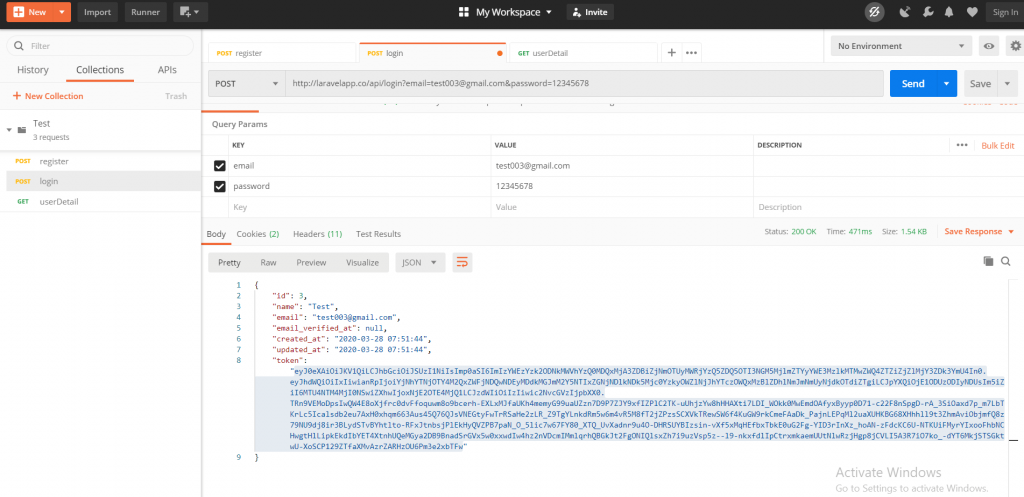
Example Value:
KEY VALUE
email test@example.com
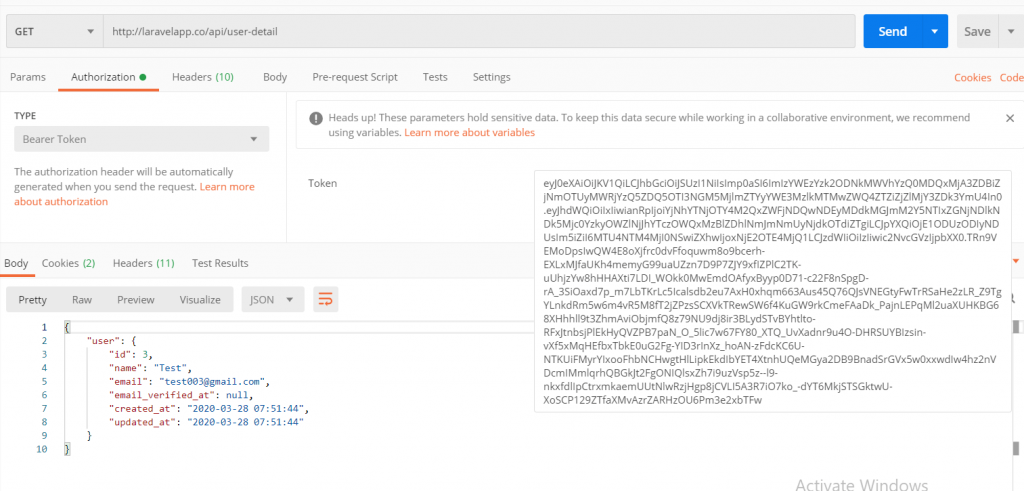
password passwordGet user details
After the login, copy the value of the access_token from the response and click on the Authorization tab and select Bearer Token from the dropdown and paste the value of the access_token copied earlier:
You need to set this access token as a Bearer Token in the Authorization header.
'headers' => [
    'Accept' => 'application/json',
    'Authorization' => 'Bearer '. $accessToken,
]
Please open the Postman app and Headers tab, define "Accept": application/json header value: